Sylvain Bouveret's web page
Some LaTeXMy LaTeX customization page
The progressbar Beamer theme (version 0.4x)
New (8th September, 2010) : Several bugs hopefully fixed (most of them concerning blocks). Better placement of footline elements. Version counter increased by 0.01.
New (19th July, 2010) : A notification mailing-list has been created → See below how to subscribe to it.
Features
This package is an attempt to build an alternative theme for LaTeX Beamer. At the beginning I tried to minimize the place allowed to the head and foot lines, while displaying useful information such as the names of the sections, the title of the presentation and the current frame number.
In the last (0.4x) version, I made some major aesthetic adjustments, removed the headline, changed the way the frame titles are displayed, added a picture, changed the style of the progressbar, of the blocks, and of the bib item. You can tune the theme using \progressbaroptions (see below). There is also a better handout mode management that won't empty your printer's ink cartridge when you print your slides (another way to say that the background is white in handout mode).
The progressbar is still there, still useless, and will still for sure impress your audience.
The last versions (>= 0.41) should now work with other color / font themes, I hope (version 0.4 behaved in a weird way when used with other color themes). If it doesn't, or if you experience some problems using it (I used some ugly quick fixes which may not work), you can still download the previous version (0.4). Of course if you don't like the last progressbar theme version, you can still download the old versions (scroll down to the middle of the page).
Several people have sent some comments and questions. Many thanks to all of them ! I did not have time to take all the remarks into account since the last version of the theme. Anyway, you can still send me some questions and comments, which are greatly appreciated.
 |
If you want to be informed when a major modification occurs, you can subscribe to the Progressbar Beamer Theme notification list. Note that it is not a mailing-list (noone but me can send a message to it), but just a way for me to send information messages. |
| Note: If you really like my theme, you can also help me to make my office (and my webpage, if I have time to scan your contribution) a better place by sending me a postcard from where you live (or a place you like): Sylvain Bouveret, LIG-STeamer, bureau 381. Bâtiment IMAG. Université Grenoble Alpes. CS 40700. 38058 GRENOBLE CEDEX 9. FRANCE. | |
Screenshots - version 0.4x
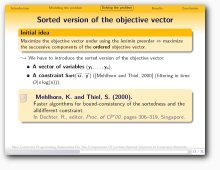
Screenshots - version 0.3x

|

|
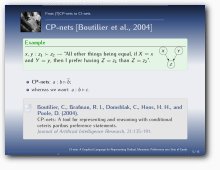
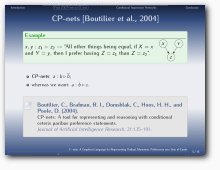
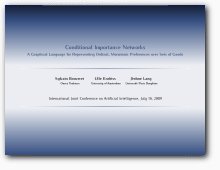
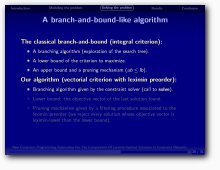
| One typical slide with a bibliography item. | The main title slide. |
|
|
| Another color theme (crane). | Another color theme (albatross). |
Download (0.42)
 |
The source code: unpack the .tar.gz archive
in the directory of your .tex file (or somewhere else, where LaTeX can find them). |
 |
Nblock has made a pkgbuild for Archlinux, which you can download from the Arch User Repository. Package details are here. |
 |
I tried to make a package for Ubuntu Lucid Lynx. It seems to work (at least on my computer). You can donload it here.
To install it, download it and type "sudo dpkg -i beamerthemeprogressbar_0.42-0ubuntu1_all.deb". |
 |
BB has made an ebuild file for Gentoo. Download it here. |
How to use it
- Download the theme and install it.
- Depending on which part of the theme you want to use (whole theme, color theme, font theme, outer theme,
inner theme), include
\usetheme{progressbar}(or\usecolortheme{progressbar},\usefonttheme{progressbar},\useoutertheme{progressbar},\useinnertheme{progressbar}) in your.texfile. - New feature in version 0.4: You can use different kinds of styles for headlines, frame titles and title page. You can switch from one style to another one by using
\progressbaroptions{x=...}in your.texfile, where the different values for x are the following:- headline - two possible values :
headline=none(default), displaying an empty headline (screenshot 1), orheadline=sections, displaying the section list in the headline, as in earlier versions (screenshot 3). - frametitle - three possible values :
frametitle=picture-section(default), displaying the section, a picture, and the frametitle (screenshot 1),frametitle=picture-subsection(default), displaying the section, the subsection, a picture, and the frametitle,frametitle=picture-nosection(added by M.S -> thank you), displaying a picture and the frametitle, without any section or subsection, orframetitle=normal, displaying only the centered frametitle, as in earlier versions (screenshot 3). - titlepage - two possible values :
titlepage=picture(default), displaying a picture in the title page (screenshot 2), ortitlepage=normal, displaying no picture, as in the earlier versions (screenshot 4). - imagename : you can specify the picture to be displayed in the title page and frame titles (default:
images/tree04).
.texfile. - headline - two possible values :
- New feature in version 0.4: The macro
\appendixhas been redefined. If you use it without any argument, it will just stop counting the number of frames: the total number of frames (displayed in the footline and used to draw the progressbar) will then be equal to the total number of frames without those appearing after this command (thus the slides in appendix do not appear in the main part of the talk). If you use an optional argument (e.g.\appendix[Appendix]), it will also display a plain frame with the argument only.
Changes from version 0.3x to version 0.4
- New design for progressbar, bibliography item, blocks.
- Picture added in the title page and frame title.
- A way to customize the theme with
\progressbaroptions. - A different style for handout mode.
Changes from version 0.32 to version 0.33
- Compatibility issue with last versions of PGF (included in new texlive distributions) solved (patch submitted by F. P. -> many thanks to him !)
Changes from version 0.3 to version 0.32
- Bug of empty institute fixed (reported by F. B. -> many thanks to him !).
- Headline text alignment fixed: the section boxes were bottom-aligned, instead of being aligned using their baseline.
- Package version number corrected in the file headers.
Changes from version 0.2 to version 0.3
- Bug fixed (reported by V. S. -> many thanks to him !) : drawing the progressbar on the very first slide of a presentation produced corrupted PS-files.
\RequirePackage{tikz}added where necessary.- minor changes in the font theme.
Older versions
- Version 0.41: whole theme,
- Version 0.4: whole theme,
- Version 0.33: whole theme, color theme, font theme, outer theme, inner theme, main theme.
- Version 0.32: whole theme, color theme, font theme, outer theme, inner theme, main theme.
- Version 0.31: whole theme, color theme, font theme, outer theme, inner theme, main theme.
- Version 0.3: whole theme, color theme, font theme, outer theme, inner theme, main theme.
- Version 0.2: whole theme, color theme, font theme, outer theme, inner theme, main theme.
Frequently Asked Questions...
Answers to some questions that actual people asked to me. I hope this will help others also.- Surround your citations by
\begin{bibunits}and\end{bibunits}to make your bibliography local. - Use
\biblio{...}to insert the local bibliography (this macro is defined in the progresbar theme and takes the name of the bib file as argument). Here is for example the code that generated the slide on screenshot 1:\begin{bibunit}[apalike] \begin{frame}{CP-nets \cite{Boutilier04a}} \begin{exampleblock}{Example} ... \end{exampleblock} \begin{itemize} \item \textbf{CP-nets}: $a: b \triangleright \overline{b}$; \item whereas we want: $a: b \triangleright c$. \end{itemize} \vfill \biblio{partage} \end{frame} \end{bibunit} -
Compile your
.texfile. It creates one filebu*.auxper bibunit. You then have to run bibtex on each one of these files. If you are lazy and if you use a bash-like shell, you can use the following script to compile them at once:for f in bu*.aux; do bibtex $f done
\title[CI-nets: A Graphical Language for Representing Ordinal, Monotonic Preferences over Sets of Goods] {Conditional Importance Networks}
\subtitle{A Graphical Language for Representing Ordinal, Monotonic Preferences over Sets of Goods}

\author{\parbox[t]{2.2cm}{\hfill Sylvain Bouveret\hfill\ \\\hbox{} \hfill{\tiny Onera Toulouse}\hfill\hbox{}}
        \parbox[t]{2.2cm}{\hfill Ulle Endriss\hfill\ \\\hbox{} \hfill{\tiny University of Amsterdam}\hfill \hbox{}}
	\parbox[t]{2.2cm}{\hfill Jérôme Lang\hfill\ \\\hbox{} \hfill{\tiny Université Paris Dauphine}\hfill \hbox{}}\\\ }

\date{International Joint Conference on Artificial Intelligence, July 16, 2009}
\usepackage{iwona} in preamble of your .tex file. Thanks to David Ch. for having pointed out this font to me.
The diffs package...
I wrote this little package for managing some issues in multi-writers working papers. It provides a few macros that allow for making comments in the text, and making changes (like adding or removing text) appear with the name of the writer that performed the change.
You can download the package and the user guide.
